Latest Posts

Braised Short Ribs

This is a low and slow meal. Perfect for weekend entertaining, or a “cena” (late night dinner). Short ribs cooked slowly in a wine sauce, need I say more? With a little time and preparation you can make this dish and look like a star to your guests! Or just make it for yourself, nothing wrong with indulging yourself every now and then… or always!

Braised Short Ribs —
(Serves 4-8 depending on how willing to share your family is o_O)

Ingredients:

-8 short ribs
-3 carrots diced
-2 celery sticks diced
-1 onion diced
-4 garlic cloves pounded into a fine paste… Or minced, depending on how much aggression you have pent up.
-salt and pepper to taste
-2 cups of red wine
-2 cups beef broth
-1 Tbsp of Worcestershire sauce
-1/4 cup tomato paste
-2 bay leaves
-chives for garnish
-olive oil

Season your short ribs with salt and pepper. Let sit and come to room temperature while you prep all of your veggies. In a big, heavy bottom, oven safe pot (a lot of requirements for a pot…) add enough olive oil to coat all the sides. Set on the stove at medium high. Brown all of your short ribs. Take them out once browned, and assess your pot (this poor pot is under a lot of pressure it seems). Are the brown bits too burned? Is there too much oil in the pan? If so wipe the pot with a dry paper towel removing the burned bits as well as the excess oil. If you remove all the oil add a tablespoon of olive oil. Throw in the onions, and cook for five minutes, then add the carrots, celery, garlic and a pinch of salt. Cook for another five minutes. Add the tomato paste, stir it in and let it cook for at least two minutes. Put the short ribs back in, then add wine, beef broth, Worcestershire sauce, and bay leaves. Stir until all is well combined. Preheat your oven to 350 degrees.

At this point you might be tempted to add a lot of salt and pepper. You can add a TINY bit of salt so that all the veggies start getting some flavor, but remember that a lot of the liquid will be reduced which means that the end result will be WAY saltier than what you started with. This is why I like to season the meat really well, then add a pinch when I put in the vegetables, and just adjust at the end.

Cover your pot and put in your preheated oven. You are going to cook this for 2 1/2 hours, check how your liquid level is doing periodically, if it is getting too low then add more stock. After the 2 1/2 hours have passed, take your pot out of the oven, uncover and place on medium high heat (You thought we were done cooking? That you were going to eat soon? Mwahahaha). Let the sauce reduce, keeping an eye on it so that it doesn’t burn, this process should take about 15 minutes.

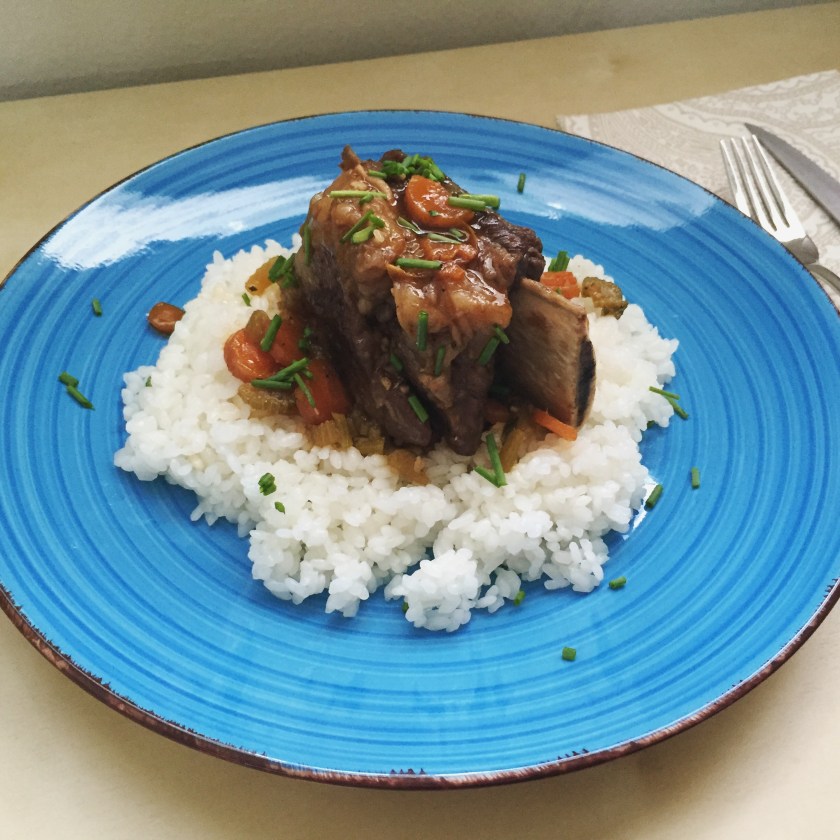
Then the time has come! Serve over rice, mashed potatoes, or even polenta. Garnish with some chives, and enjoy!

Whenever I cook this for guests, I remember that episode of The Office where Michael and Jan have the dinner party and they start making the Osso Buco when the guests arrive… I don’t recommend doing this, or you might have some very cranky guest prone to loud and embarrassing outbursts… Hahaha

St. Patrick’s Day Extravaganza — Nutty Soda Bread

Soda bread is a great thing, because it is so incredibly low maintenance. It does not require yeast, which can take quite a bit of work to prepare. You can literally mix the ingredients together, throw it in the oven and fuggetaboutit! Which allows you to have fresh, homemade bread at dinner without spending ten hours kneading, letting it rise and such.

Soda bread is also extremely versatile. You like sweet bread? add more sugar, or honey, and raisins. You like herbs? Add rosemary or thyme. Like nuts? Add whichever one you like. The bottom line is that soda bread is very forgiving, which gives you room to experiment without it turning into a disaster.

I particularly like walnuts, and thought that they would be great in soda bread. Well, they are!

image

Here is the recipe —

Ingredients:

-2 cups whole wheat flour

-2 cups self rising flour

-1 1/2 tsp salt

-1 tsp baking soda

-1 tsp baking powder

-3 Tbsp sugar

-3 Tbsp honey

-1/3 cup melted butter

-1 cup buttermilk

-1 egg

-1/2 cup chopped walnuts

Set oven to 375 degrees. In a large mixing bowl combine whole flour, self rising flour, salt, baking soda, baking powder, walnuts and sugar. Make sure everything is mixed well. Stir in butter, honey, and buttermilk until the dough comes together.

DO NOT knead

DO NOT over mix

image

Very important to just mix enough until it comes together. Then shape into a ball and put it in a buttered, oven safe, baking sheet. Get a knife and make a cross on the top of it. While it does have religious implications that went along with making the shape of the cross instead of, lets say, a square, there is also science behind it. If you make the cuts the heat will penetrate the dough, naughty…, which will allow for more even cooking. So do not skip this step.

Before you pop it in the oven, brush the top surface with melted butter, for added gloss. Let it bake for 30 minutes, at this time brush with butter again and insert a pick into the center and see if it comes out clean. If it doesn’t then put back in for another 10 minutes, and repeat until the pick comes out clean.

Serve hot, fresh off the oven with a generous dollop of butter or a drizzle of honey. It will be good for up to two days, after that it will be too hard to be pleasant.


This concludes our St. Patrick’s Day series. I hope you all enjoyed it and that you tried or will try at least one of these recipes!!

image

St. Patrick’s Day Extravaganza — Honey Mustard Corned Beef Roast

Happy St. Patrick’s Day everyone! We continue our series with the main star of our meal (though that colcannon certainly gave it a run for its money) the Corned Beef roast!

Now, as you might know, corned beef is a brisket cut, and like any brisket it needs to be cooked at a low temperature for a long time (low and slow) in order for it to be soft and tender when we eat it.

Therefore this roast is going to take a bit of time to prepare, but never fear, your patience will be rewarded!!

image

Honey Mustard Corned Beef Roast —

Ingredients:

-corned beef brisket

-2 Tbsps honey

-2 tsps whole grain mustard

-2 1/2 Tbsps Dijon mustard

-2 medium-sized onions quartered

-3 garlic cloves, puréed

-1 cup chicken stock

-salt and pepper

Mix whole grain mustard, Dijon mustard, honey, garlic and pepper. Lay the onions in the bottom of a roasting pan and set the corn beef brisket on top. Brush the brisket liberally with the honey mustard mixture. Use about half and preserve the rest.

Preheat oven to 350 degrees. Pour chicken stock in the bottom of the pan. Put the roast in the oven and cook for one hour and a half. At that time brush it with half of your remaining honey mustard mixture. I know that the mustard mixture might not want to stick to the brisket and it might actually fall off a bit. If that is the case, use spoon the mixture over instead of brushing it. That sucker is getting honey mustard whether it likes it or not!

All that brushing/spooning pays off when you get a delicious crust like this.

All that brushing/spooning pays off when you get a delicious crust like this.

Back in the oven for another hour, then repeat the whole brushing/spooning process with the remaining mixture. Once again back in the oven for another half hour.

Then control your urge to make any cut in the corned beef and let it rest for at least 15 minutes. The reason for this, like any food network star will tell you, is that if you cut it right off the oven then all the juices will make a run for it, leaving you with a dry piece of meat. So go have a pint or do a jig while you wait

Now is the time you have all been waiting for, slice the honey mustard corned beef roast (that is a mouthful) into very thin slices so you can get your mouth full, literally.

Serve with a side of colcannon and soda bread and you will have the perfect Irish meal. Speaking of, come back tomorrow for a Soda Bread recipe.


St. Patrick’s Day Extravaganza — Colcannon

I love St. Patrick’s Day! It is a day we get to celebrate the culture of another country… and by culture I mean FOOD. Glorious corned beef, soda bread, potatoes, good beers, and whiskey… It brings a tear to me eye!

Therefore I have decided that for the next couple of days I will give you some of my best Irish food recipes. The objective is to have a full Irish food spread by the end of this series, so you can impress your loved ones this weekend with your culinary know how of Irish cuisine!

We will start with an Irish staple; the potato. Just like the Hispanics and Asians have the rice, the Irish have the potato. A gloriously versatile and delicious tuber that truly does not mind taking the backstage to other ingredients, or being the star of the show, and today it is the star!

I could have made a simple mash, but why be boring? Mashed potatoes is something we are ALL familiar with. So for today’s recipe I went with something a little more Irish and a little more exotic for us; Colcannon.

image

Colcannon —

Ingredients:

-8 yellow potatoes (peeled and cut into cubes)

-6 bacon slices diced

-3 Tbsp unsalted butter

-2 green onions diced

-1 cup chopped cabbage (can use kale instead)

-1 1/2 cup heavy cream (can use milk)

-salt and pepper to taste

In a medium sized pot put the potatoes and cover with cold water. Stir in 1 tablespoon of salt and bring the potatoes to a boil. Once they are fork tender, drain in a colander and set aside.

Rinse and dry the pot where you boiled the potatoes (to reduce cleanup later!) and return to medium-high heat. Add the bacon until you have rendered most of the fat (the bacon should look nice and crispy). Take the bacon out and get rid of half the fat you have in the pot (you can reserve it for later use), add 1 tablespoon of butter, once melted add the cabbage and saute for about 3 minutes, or until it has started to wilt.

Lower your heat to low and add the potatoes, add your cream and start to mash the whole mixture. Once the potatoes are very smooth add in the remaining 3 tablespoons of butter, green onions, crispy bacon, and salt and pepper to taste. Mix everything up, making sure that all the ingredients are well incorporated. If you like a smoother consistency then add more cream or milk.

Serve hot with any of the following toppings; butter, bacon, green onions, chives or parsley.

Tomorrow we will go over how to make a delicious Honey Mustard Corned Beef Roast, so make sure to tune in!

Bento Series #14 — Healthy Joes

I love sloppy joes. They are a no frills, delicious food that is pretty fun to eat since the whole purpose of it is to get sloppy with it 😉

Another huge benefit of it is that you can hide any veggie you want in it. Have a picky eater, such as a child or a husband? Then don’t fret, you can hide a lot of goodness in here and your fussy eater will never find out, neither will your child. This recipe in particular has a lot of vegetables so I renamed it “Healthy Joe.”

Bento Components

  • Healthy Joe
  • Strawberries
  • Tamagoyaki

Healthy Joe —

-1 package ground beef

-3 carrots shredded or grated

-1/2 zucchini diced

-1/2 onion diced

-1 small squash diced

-1/2 red bell pepper diced

-2 garlic cloves minced

-1 cup ketchup

-1 cup tomato sauce

-1 Tbsp Worcestershire sauce

-1 dash hot sauce

-1 Tbsp lemon juice

-1 Tbsp brown sugar

-1 tsp garlic powder

-1 tsp onion powder

-1 tsp cumin

-salt and pepper to taste

In a pan add enough oil to coat the bottom. Add meat and onions, saute for a few minutes. Add the garlic, carrot, zucchini, squash, and bell pepper and let saute. Meanwhile in a mixing bowl add ketchup, tomato sauce, Worcestershire sauce, lemon juice, hot sauce, brown sugar and mix thoroughly. Add the onion powder, garlic powder, cumin, salt and pepper to the meat and vegetable mixture. Stir until all the seasonings have combined with the meat. Let cook for another five minutes. Finally add the sauce mixture and stir. Let cook until the sauce has reduced by one third and all the vegetables are soft.

Serve on your favorite bun with some green onions for garnish (if you can get away with it add some carrots also, it gives it a nice crunch). Serve hot or room temperature.


For the rest of the bento just add some fruits as a side such as strawberries, feel free to drizzle them with honey and then they can double as a dessert!


Gabose Korean Barbecue

Name: Gabose Korean & Japanese
Cuisine: Korean, Japanese
Location: 4991 N University Dr
Lauderhill, FL 33351

Gabose has won a lot of local awards. A lot of publications named it the best Korean barbecue in the area, therefore we decided we had to try it!

A little information on how it works. You can choose to sit in a normal table and have food brought to you from the kitchen (boring), or you can choose to sit in the barbecue area, where you get to cook your own food. These tables are equipped with a great big whole in the center of them, this is where they will put in a bat of extremely hot coals with a metal grate on the top that will serve as your grill surface. There are exhaust vacuums hanging from the ceiling that will pull in most of the smoke and the food smells so that you wont leave smelling like a kitchen. Also it will help you control the fire, if you are getting too much flame-ups then bring the vacuum closer and it will keep the fire at a low level.

image

There are two kinds of cooking you can do; charcoal or gas grill.  For charcoal cooking you HAVE to order at least two meats per table which range from $21 to $27 per order. For gas grill cooking you also have to order two meats, but they average $18 per order. Now this sounds pretty pricey, but each meat order comes with an array of side dishes which are included in the price, as well as a bowl of rice (2 per table), and two meat orders can feed up to four people if you stretch it a bit.

image

As appetizer we have tried the green onion Korean pancake and the gyozas. The pancake was very delicious, fluffy and full of green onions (something I enjoy, but the hubby cautions against if massive quantities of green onions are not your thing) with a nice soy sauce based dipping sauce. The gyozas were rather average, with more vegetables than usual.

image

We were a party of seven and ordered the galbi, shrimp, pork, and chicken as our meats. These came in a variety of marinades and seasonings. Both of us loved the pork and decided it was our favorite. However we disagree in what our second favorites were. While I enjoyed the galbi the hubby preferred the chicken. A note of caution, all the meats are sliced very thinly/small be careful not to overcook them. They will not take long at all and while the pork and the galbi have enough fat that keeps them moist, the chicken will dry up very fast.

image

The real star in my opinion (not the hubby’s he prefers meat) are the side dishes or banchan. I absolutely loved all of them. The offerings are constantly changing due to what is in season. They have classic kimchi, cucumber kimchi, potatoes in a kimchi sauce, lettuce in a sesame oil marinade, potato salad, seaweed and onions, pickled radish, tofu, cabbage with noodles, among others many others. My preferred method of eating is making a bite-sized wrap — lettuce leaf, rice, meat, and sides. The hubby’s was rice with meat and then eat sides as their own individual meal.

image

And of course the meal comes with classic sticky rice, which was delicious and extra sticky. However, they use the Korean-style metal chopsticks here, which are already a bit harder to use, but these are flat rectangular shapes instead of round and can be tricky even for a chopstick veteran. Extra rice was pricey at $2 for a small container but worth it.

image

Now for the bad, we also ordered a rice bibimbap (mixed rice dish) just to try it since it is such a classic Korean dish. We were sorely disappointed. We got the chicken bibimbap and it was lacking in flavor. There was no salt in the dish and the chicken was very dry. Once you mixed in the gochujang (red pepper paste) the salt problem decreased slightly but it was still low on seasoning and lacked flavor. They did serve it in the hot stone bowl which made the rice nice and crisp at the bottom, like it is supposed to. Also, do not expect great service. There is literally only one “nice” server. All the other ones kind of have an attitude. It doesn’t really detract from the experience since you barely interact with them, but be warned.

All in all we highly recommend this restaurant. It is a fun experience, great for dates since you will have a lot of time to talk while you cook your food. We both really enjoyed the charcoal grilling and feel like the food tasted delicious for the most part. Go check it out if you find yourself in the area!

Bento Series #13 — Potato Chip “Fried” Chicken

This bento is a little bit mysterious… a little tricky… The reason being that potato chips are unhealthy, and fried chicken is unhealthy… but this meal is still super healthy. How did I manage to pull that magic trick? Let me explain.

First off it is oven “fried”, second of all the oil used is coconut oil, which we all know is the cure for all ailments in the world O_O. The last part of this magic trick is that I don’t actually use potato chips, I use potato starch flour which can be found at any Asian market. The amazingness of this “fried” chicken is that the potato starch makes it super crispy and adds a delicious potato chip flavor to the chicken. Nevertheless if you can not find potato starch then you can use panko or flour instead.

Healthifying (is that even a word o_O) a meal:

1- Always try to oven “fry” things when possible. A lot of the time you will get that delicious crunch without getting all the calories of deep frying.

2- Use healthy oils like sunflower oil, extra light olive oil, coconut, or even peanut oil.

3- Small portions are key. So you want to have some delicious fried food, have it! Just eat a small quantity of it. For example this bento only had two chicken drummettes (part of chicken wing) per box. So even though it is oven “fried” I still prefer to load that box with veggies.

4- Load the plate/bento box with vegetables. Be a vegetable ninja, sneak veggies everywhere you can… Hmm, delicious rice *pow* now it is delicious rice with veggies. Delicious meatballs? *ka-pow* now it is chicken, tofu and carrot meatballs. Be a NINJA!

Bento Components:

  • Mixed vegetable rice
  • Potato Chip “Fried” Chicken
  • Tamagoyaki
  • Sauteed Veggies

Potato Chip “Fried” Chicken —

Ingredients:

-1 package chicken drummettes

-juice of 1/2 a lemon

-salt and pepper to taste

-1/2 cup of potato starch (can use flour instead)

-1/2 tsp cayenne pepper

-1/2 tsp paprika (optional)

-1 Tbsp garlic powder

-1 tsp onion powder

-2 Tbsp coconut oil (can use olive, canola, peanut, sunflower, etc.)

-parsley or green onion for garnish

Season the chicken drummettes with lemon juice, salt, pepper, garlic, and onion powder. Set aside and let rest for at least 1 hour. Mix potato starch with cayenne and paprika. Coat the chicken. Preheat oven to 400 degrees. Line a baking sheet with aluminum foil and spread the coconut oil to coat it evenly. Place the chicken in the baking sheet.

Bake at 400 degrees for 15 – 20 minutes, then turn the chicken and cook for another 10 minutes so that you get a nice even golden brown color everywhere. Take the chicken out and garnish with parsley or green onions.


The rest of the bento is very easy to assemble. Sautee some veggies in a little oil, when they are almost cooked add 1 tablespoon of soy sauce and cook until the sauce dries up. Let cool before putting in the bento.

As for the rice just mix in 1 diced carrot, 4 diced mushrooms, 1/3 of a zucchini diced, and 1/2 a cup of par-cooked wild rice with the uncooked rice. Follow the box instructions if cooking stove-top or just add in your rice cooker before starting. Make sure to season with salt. Once completed mix well to make sure the veggies are dispersed.

Tamagoyaki is a japanese rolled omelette. I promise I will post the recipe for it soon.

Assemble as prettily as possible to bring a little ray of happiness into your or your loved one’s life! Though if the fried chicken didn’t make them happy, I think they are a lost cause.

Bento Series #12 — Salmon Fillet

I am very proud of this bento, it is one of the prettiest I have made to date! Lets take a minute to admire my beautiful creation… admire… admire… admire it, I say!

For all of its beauty it is actually pretty simple to make.

Bento Components:

  • Salmon Fillet
  • Sushi Rice
  • Fried Okra
  • Baby Carrots
  • Radish Flowers with Parsley Leaves

Salmon Fillet–

Ingredients:

-salmon fillet (1 per person, seasoning per fillet add more if more than one fillet)

-1/4 cup soy sauce

-1 Tbsp sake (or white wine)

-1 clove of garlic

-1 tsp grated ginger

-1 Tbsp olive oil

-1 tsp sugar

-salt and pepper to taste

Mix all the ingredients in a resealable bag and place the fillet in it. Marinate the salmon for at least 30 minutes before cooking. In a frying pan saute the salmon with a little olive oil. Leave the skin on the fillet, cook the flesh side down for a minute, then skin side down for five minutes. Do not over cook, salmon can get pretty dry if over cooked! That’s it, serve hot or at room temperature, delicious either way.


As for the rest of the components just make the rice however you prefer (rice cooker or stove top, see recipe HERE). I bought the frozen okra that comes pre-breaded and it came out “OK”, pretty ambivalent about it so will try making my own recipe some day. The baby carrots can be purchased in any super market. Make the flowers out of radishes and place over parsley leaves. I will post a tutorial on how to make them someday! I placed the salmon and fried okra over some greens so as not to stain my pretty bento box.

Here is how it looks when I was eating it:

image

Just remove the radish and carrots from the other food and heat the rice, salmon and okra in the microwave if you prefer it hot (as I do) or you can eat it at room temperature.

And that’s it, nothing complicated behind this masterful work of art!


Quickie Smoothie

For this recipe there is not a lot of foreplay *cough* I mean before prep necessary. It is quick and easy, which is exactly what I am looking for when I drag my semi-awake body to the kitchen Mondays at 7 in the morning. I don’t want to be awake yet, much less be cooking at this hour. Which is why this smoothie recipe is great to start your week.

Now if you want to freeze your own fruit, milk your own cows, or press your own almonds (for almond milk, get it?) be my guest. However this recipe is about convenience and speediness. About the constant struggle of mankind against the clock, against society’s preconceptions of what adult life must be like, against the cruelty perpetuated upon the individuals that are made to wake up at an ungodly hour after having a sleepless night thanks to their toddlers deciding to practice bed karate in their sleep…

But I digress.

For this recipe all you need is the following:

-1 cup frozen strawberries
-1/2 cup frozen blueberries
-1 sprig of basil (about 2-3 leaves)
-1 cup of milk (cow, soy, almond, whatever you prefer)
-2 Tbsp of honey

image

Put all of these in the blender and mix until you reach a consistency you are happy with. Note that you can buy the fruits frozen in the frozen section of any supermarket, or you can buy them fresh and freeze them ahead. Also since the fruits are frozen you don’t need any ice which would just water the smoothie down, but if you don’t have any frozen fruit do not despair, add 1/2 a cup of ice and 1 extra tablespoon of honey to compensate.

Serve in a nice to-go cup and enjoy after you have chugged down enough coffee to be able to drive to work… Or is that just me?

Prepping And Cooking Ahead

Sometimes when I have free time (oh glorious day!), usually on a Sunday afternoon, I like to do some prep and cook a few things ahead for the week. It makes my life way easier later on if I can get all my veggies cleaned and cut, if I can portion and season my meats, and in some cases, if I can actually cook the dish in advance.

Now for story time: something you need to know about my husband and me, we HATE leftovers… End of story (that was a short one).

I honestly don’t know why that is, but we like our dinner to be freshly cooked, and sadly cooking ahead kind of falls in a grey area between fresh and leftovers. Therefore I don’t like to cook too many things ahead, just the few things that I feel will not lose a lot of their deliciousness. That being said, I don’t have anything against prepping the food ahead of time and then freezing, or seasoning it ahead, as long as most of the cooking process takes place right before we eat… Which just makes my life harder, I know -_-

DISCLAIMER: I do make some foods ahead and freeze them, but most of the time some cooking needs to take place afterwards (dumplings, casseroles, sauces, etc.).

Here is an example of some of the prepping ahead I sometimes do:

Vegetables being prepped, Bacon on deck (check out my awesome baseball reference)

Vegetables being prepped, Bacon on deck (check out my awesome baseball reference)

As seen above I am cutting up vegetables and bacon. In this particular instance I prepped ahead for two days.

Day 1: Sauteed Italian Sausage
IMG_1429

Prep Day:
-1 red pepper
-1 package of Italian sausage
-4 pink radishes
-2 hard boiled eggs
-1 head of broccoli cut into bite size pieces

Slice all your veggies and Italian sausage. Hard boil eggs.

Mix red bell pepper and italian sausage in a resealable bag. Add some powder seasoning to your taste; such as pepper, garlic, onion, or cumin. Seal and leave in fridge if you are making next day or freeze if using later on in the week.

In a plastic container put the two eggs plus 1/4 cup of soy sauce, 1/4 cup of water, and 1 Tbsp of mirin. Let them marinate overnight. They can be eaten the next day or kept in the fridge for up to 3-4 days.

Steam/boil the broccoli and store in the fridge. You can substitute this for frozen broccoli. If using frozen you can just pop in the microwave the day you will eat it for 4 minutes and it will be ready to go. Nothing wrong with a few shortcuts. I won’t tell on you O_O

Day Of:
-Make rice
-Saute sausage and pepper
-Slice hard boiled eggs
-Arrange bento as prettily as possible including broccoli and radishes

EAT!!!

Day 2: Bacon Wrapped Asparagus
IMG_1455

Prep Day:
-1 package of asparagus
-1 package of okra
-2 hard boiled eggs
-4 radishes
-6 slices of bacon

Cut off bottoms of asparagus, they are too hard and fibrous to eat. Cut the bacon strips in half. Blanch the asparagus. That means that we are going to cook them only for 2-3 minutes in boiling water and then, immediately after, we are going to shock them with ice cold water. This will scare them so much that it will turn them super green… Then we will make them feel better by wrapping them in bacon… Bacon makes everything better. You can set aside at this point. Store in the refrigerator for up to 3 days.

Cut off the top of the okra. Steam or boil okra until fully cooked (about 8-10 minutes), once it cools cut in half on the bias (it looks pretty) and store in the fridge.

Hard boil eggs and follow the same method as mentioned before (obviously hard boil and marinate all the eggs at the same time… that was obvious… right?).

Cut the radishes in half and store.

Day Of:
-Make rice
-Pan fry the bacon wrapped asparagus
-Slice hard boiled eggs
-Arrange bento as prettily as possible incorporating the okra and the halved radishes

EAT!


I find that this way, when I can have the food partially ready, putting a home-cooked meal on the table or taking lunch to work becomes a more realistic possibility in my super busy life.